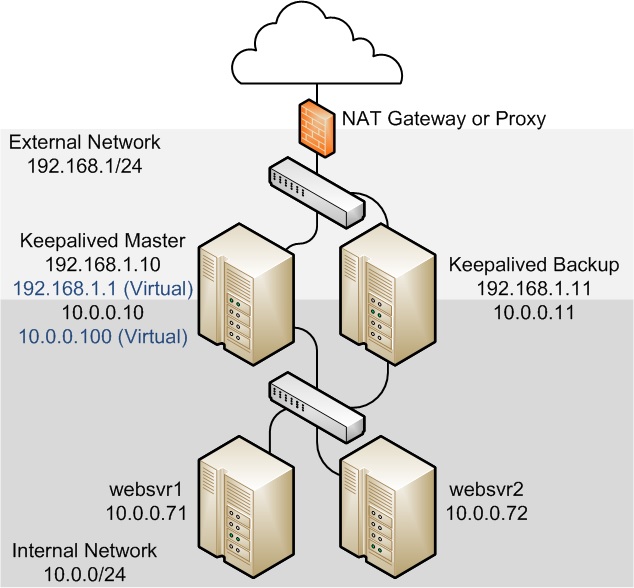
Keepalived和LVS-NAT

keepalived_lvs_nat

架构

LVS服务器将来自的ens33的HTTP数据包(客户请求)通过NAT转发到的Backend01和Backend02服务器。

将两个后端Web服务器的默认网关更改为LVS的内部IP地址。 (示例中为10.0.0.100)

LVS的内部IP地址(示例中为10.0.0.100)不需要设置网关。


            +----------------+-----------------+
            |                                  |
192.168.1.10|ens33 --- VIP:192.168.1.5 --- ens33|192.168.1.11
    +-------+--------+                +--------+-------+
    | LVS+Keepalived |                | LVS+Keepalived |
    +-------+--------+                +--------+-------+
    10.0.0.10|ens37 ----- VIP:10.0.0.100 ---- ens37|10.0.0.11
            |                                  |
            +----------------+-----------------+
                            |
    +------------+            |             +------------+
    |  Backend01 |10.0.0.71   |    10.0.0.72|  Backend02 |
    | Web Server +------------+-------------+ Web Server |
    |            |ens33                  ens33|            |
    +------------+                          +------------+

lvs 服务器安装配置

## Install ipvsadm and keepalived
1
2
3
4
5
6
7
8
9
10

yum -y install ipvsadm keepalived psmisc

## 配置director打开网卡间的转发功能
echo 'net.ipv4.ip_forward = 1' >> /etc/sysctl.conf
sysctl -p

touch /etc/sysconfig/ipvsadm
systemctl start ipvsadm
systemctl enable ipvsadm

防火墙

## 配置vrrp广播
firewall-cmd --zone=public --add-rich-rule='rule family="ipv4" destination address="224.0.0.18" protocol value="vrrp" accept' --permanent
firewall-cmd --reload

## 配置防火墙,使外部网络的接口(ens33)与内部网络的接口(ens37)位于不同的区域。

firewall-cmd --get-active-zones

firewall-cmd --zone=public --remove-interface=ens37    
firewall-cmd --zone=internal --add-interface=ens37    
firewall-cmd --permanent --zone=public --remove-interface=ens37    
firewall-cmd --permanent --zone=internal --add-interface=ens37

firewall-cmd --get-active-zones

## 在外部网络接口上配置NAT模式(伪装),区域为public

firewall-cmd --zone=public --add-masquerade
firewall-cmd --permanent --zone=public --add-masquerade
firewall-cmd --zone=public --query-masquerade
firewall-cmd --zone=internal --query-masquerade

## 如果尚未为防火墙启用,请在外部和内部网络接口之间配置转发规则,例如:

firewall-cmd --direct --permanent --add-rule ipv4 filter FORWARD 0 -i ens33 -o ens37 -m state --state RELATED,ESTABLISHED -j ACCEPT

firewall-cmd --direct --permanent --add-rule ipv4 filter FORWARD 0 -i ens37 -o ens33 -j ACCEPT

firewall-cmd --direct --permanent --add-rule ipv4 filter FORWARD 0 -j REJECT --reject-with icmp-host-prohibited

firewall-cmd --reload


## 开放访问端口
firewall-cmd --zone=public --add-service=http    
firewall-cmd --permanent --zone=public --add-service=http

后端服务器路由配置

## 配置Keepalived NAT模式负载均衡的后端服务器路由

## 在您打算与Keepalived负载平衡器一起使用的每个后端真实服务器上,确保路由表包含负载平衡器内部网络接口的虚拟IP地址的默认路由。

例如,如果是虚拟IP地址 10.0.0.100,则可以使用 ip命令检查路由表并设置默认路由:

# ip route show
10.0.0.0/24 dev enp0s8 proto kernel scope link src 10.0.0.71 
#ip route add default via 10.0.0.100 dev enp0s8
#ip route show
默认通过10.0.0.100 dev enp0s8 
10.0.0.0/24 dev enp0s8 proto kernel scope link src 10.0.0.71 
要使enp0s8重新启动时保持默认路由,请创建该文件 /etc/sysconfig/network-scripts/route-enp0s8:

# echo "default via 10.0.0.100 dev enp0s8" > /etc/sysconfig/network-scripts/route-enp0s8

keepalive 配置

## Configure Keepalived
1
2
3
4
5
6
7
8
9
10
11
12
13
14
15
16
17
18
19
20
21
22
23
24
25
26
27
28
29
30
31
32
33
34
35
36
37
38
39
40
41
42
43
44
45
46
47
48
49
50
51
52
53
54
55
56
57
58
59
60
61
62
63
64
65
66
67
68
69
70
71
72
73
74
75
76
77
78
79
80
81
82
83
84
85
86
87
88
89
90
91
92
93
94
95
96
97
98
99
100
101
102
103
104
105
106
107
108
109
110
111
112
113
114
115

cat > /etc/keepalived/keepalived.conf << EOF

global_defs {
notification_email {
root@localhot
}
notification_email_from root@lvs.server
smtp_server 127.0.0.1
smtp_connect_timeout 30
## 不同服务器,分别设置一个标识
router_id LVS_Server

vrrp_garp_master_refresh 60
vrrp_garp_master_delay 5
vrrp_mcast_group4 224.0.0.18
}

vrrp_sync_group VRRP1 {
#
group {
external
internal
}
}

vrrp_instance external {
state BACKUP
interface ens33
virtual_router_id 60
## 优先级设置,0-254,数值越大优先级越高,MASTER要设置高于BACKUP
priority 100
nopreempt
# VRRP 广播时间间隔
advert_int 1
smtp_alert
authentication {
auth_type PASS
auth_pass PassWord6409284
}

virtual_ipaddress {
192.168.1.5 dev ens33
}
}

vrrp_instance internal {
state BACKUP
interface ens33
virtual_router_id 70
## 优先级设置,0-254,数值越大优先级越高,MASTER要设置高于BACKUP
priority 100
nopreempt
# VRRP 广播时间间隔
advert_int 1
smtp_alert
authentication {
auth_type PASS
auth_pass PassWord6409284
}

virtual_ipaddress {
10.0.0.100/24 dev ens37
}
}

virtual_server 192.168.1.5 80 {
# monitored interval
delay_loop 3
# lvs 调度算法,rr|wrr|lc|wlc|lblc|sh|dh
lb_algo rr
# lvs 转发模式,NAT|DR|TUN
lb_kind NAT
protocol TCP

# 后端服务器
real_server 10.0.0.71 80 {

#inhibit_on_failure ##表示在节点失败后,把他权重设置成0,而不是冲IPVS中删除
#notify_up <STRING> | <QUOTED-STRING> ##检查服务器正常(UP)后,要执行的脚本
#notify_down <STRING> | <QUOTED-STRING> ##检查服务器失败(down)后,要执行的脚本
#uthreshold <INTEGER> ## maximum number of connections to server
#lthreshold <INTEGER> ## minimum number of connections to server

weight 1

HTTP_GET {
url {
path /
status_code 200
}
connect_timeout 3 ## 连接超时时间
nb_get_retry 3 ## 重连次数
delay_before_retry 3 ## 重连间隔
}
}

real_server 10.0.0.72 80 {
weight 1
HTTP_GET {
url {
path /
status_code 200
}
connect_timeout 3
nb_get_retry 3
delay_before_retry 3
}
}
}

EOF

systemctl start keepalived
systemctl enable keepalived

lvs-nat说明

NAT方式配置

这种方式需要Director和各Real Server在同一IP网络内(172.16.100.0/24),具体配置如下示例:

    Director:          ens33    --VIP:192.168.0.146     gateway:局域网网关(路由器地址)
                        ens37    --DIP:172.16.100.10     gateway:为空,不需要填

    Real Server1(RS1):  ens33    --RIP: 172.16.100.2      gateway:172.16.100.10

    Real Server2(RS2):  ens33    --RIP: 172.16.100.3      gateway:172.16.100.10


配置director打开网卡间的转发功能,echo '1' >/proc/sys/net/ipv4/ip_forward
## LVS - 地址转换(NAT)模式示例,Director节点的lvs_serv_nat.sh脚本
1
2
3
4
5
6
7
8
9
10
11
12
13
14
15
16
17
18
19
20
21
22
23
24
25
26
27
28
29
30
31
32
33
34
35
36
37
38
39
40
41
42
43
44
45
46
47
48
49
50

#!/bin/bash

# 配置实服务主机IP,调度器虚拟IP(调度器节点需要双网卡,对外地址为VIP,内网地址需要设置为RS网关)
Vip=192.168.1.100
Rs1=192.168.1.101
Rs2=192.168.1.102

source /etc/rc.d/init.d/functions

case "$1" in

start)

echo "Start LVS of Server..."

# 打开Director服务器上开启路由转发功能(多网卡下的网卡间数据包转发)
echo 1 > /proc/sys/net/ipv4/ip_forward

# 清空防火墙nat表的所有链
#iptables -t nat -F
# 删除防火墙nat自定义链
#iptables -t nat -X

# 新增一个子网卡
/sbin/ifconfig ens33:0 $Vip netmask 255.255.240.0 up
# 设置Director的ipvs
/sbin/ipvsadm -C
# 在内核虚拟服务器表中添加一台虚拟服务器
/sbin/ipvsadm -A -t $Vip:6500 -s rr # rr 表示轮询调度
# 在一台虚拟服务器中增加一台新的真实服务器(指定虚拟服务对应真实服务的关系,指定负载均衡模式)
/sbin/ipvsadm -a -t $Vip:6500 -r $Rs1:6500 -m # -m 表示NAT模式
/sbin/ipvsadm -a -t $Vip:6500 -r $Rs2:6500 -m
# 启动LVS
/sbin/ipvsadm
;;
stop)

echo "Close LVS of Server..."
echo "0" >/proc/sys/net/ipv4/ip_forward
/sbin/ipvsadm -C
/sbin/ifconfig ens33:0 down
;;

*)
echo "Usage: $0 {start|stop}"
;;

esac
exit 0

LVS

该/etc/keepalived/keepalived.conf 配置文件被分成以下部分:

global_defs
定义全局设置,例如发送通知消息的电子邮件地址,SMTP服务器的IP地址,SMTP连接的超时值(秒),标识主机的字符串,VRRP IPv4和IPv6多播地址以及SNMP陷阱应该启用。

static_ipaddress , static_routes
定义静态IP地址和路由,VRRP无法更改。如果已在服务器上定义了地址和路由,并且这些服务器已具有网络连接,则不需要这些部分。

vrrp_sync_group
定义一起故障转移的VRRP备份VRRP同步组。

vrrp_instance
为VRRP同步组的内部或外部网络接口的成员定义可移动的虚拟IP地址,该状态在状态转换期间与其他组成员一起提供。每个VRRP实例必须具有唯一值virtual_router_id,该值标识主服务器和备份服务器上的哪些接口可以分配给定的虚拟IP地址。您还可以指定要在状态转换运行脚本BACKUP,MASTER以及FAULT,以及是否触发SMTP警报状态转换。

vrrp_script
定义跟踪脚本,Keepalived可以定期运行以执行来自a vrrp_instance或 vrrp_sync_groupsection的监视操作 。

virtual_server_group
定义虚拟服务器组,允许真实服务器成为多个虚拟服务器组的成员。

virtual_server
定义用于负载平衡的虚拟服务器,该服务器由多个真实服务器组成。

参考

https://www.server-world.info/en/note?os=CentOS_7&p=lvs&f=2

https://docs.oracle.com/cd/E52668_01/E54669/html/section_xsx_wl2_4r.html